Understanding Your Painting Estimate – The Kenneth Axt Painting Difference

Whether you are painting a 400 square foot family room or a 10,000 square foot exterior, the first step to a great result is THE PAINTING ESTIMATE. Cost influences the choice at every budget atlanta interior paintinglevel, so an accurate, detailed painting estimate is paramount to selecting the right painting contractor for your job. No one likes surprises, especially when they involve budget overruns on an estimated job.

At Kenneth Axt Painting, we take our estimation process very seriously. We pride ourselves on providing a high quality work product at a FAIR AND HONEST PRICE. We have more than 40 years experience painting Atlanta’s finest homes and you will benefit from the eye for detail that all those years bring.  Learn more about Kenneth Axt Painting here.

All of our estimates are performed by Kenneth or David Axt, the founding brothers of the company. They follow a 14 point process that includes the sight and touch of a professional so that details are not overlooked. Each estimate takes roughly two hours and is left with the home owner on the day it is completed.

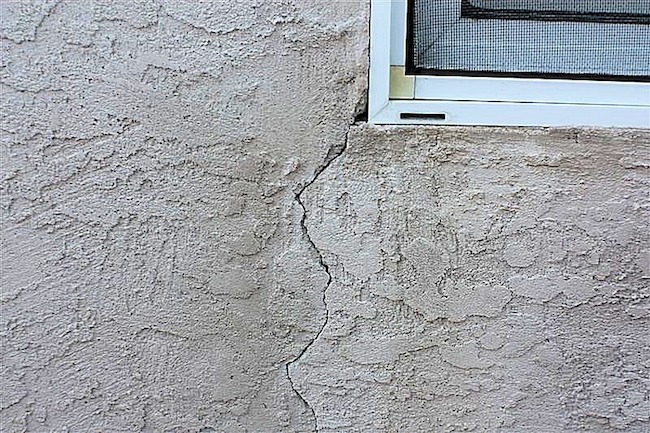
On exterior painting jobs, we look closely for signs of wood rot, water damage, insect damage, protruding nail heads, caulking and so much more. For interior painting work, details such as lifting drywall tape, nail pops, caulking of trim work, or signs of water damage are noted and included in the estimate. The precision of the inspection provides the homeowner with the confidence that the job will be done correctly and last for years to come.

Other painting companies often “overlook” the maintenance details that we see as a matter of routine. The outcome is either that the estimate initially “seems lower” or, the problems are simply “painted over” and ultimately compromise the quality of the result.

Another key component to UNDERSTANDING YOUR PAINTING ESTIMATE is appreciating the differences in the materials that will be employed in the completion of your job. Kenneth Axt Painting uses only the highest quality Sherwin Williams primers, paints, stains and caulk, as well as top of the line construction materials for replacement.

While high end materials can cost more per gallon, it is well worth the investment because of the longevity that they afford. Using caulk which is the best on the market can cost $11 per tube but is a critical function in preventing rotting wood. Specialty materials may be used; metal roof paints that last twice as long as a regular house paint or $80 per gallon oil base metal paint for the iron porch railings. There are also special acrylics that are purchased to use on coach lamps and chimney caps.

In addition to the quality materials, CRAFTSMANSHIP goes hand in hand in producing a top quality result that will endure for years to come. Kenneth Axt’s painting and carpentry crews are hand-picked and trained exclusively by Kenneth to ensure that the high standards are followed to produce a finished product that meets our company’s quality guidelines. From meticulous carpentry to hand painted (not sprayed) trim work, where possible, our goal is to provide our clients with a satisfying experience that they will be proud of!

For a long lasting job, the devil is in the details. Kenneth Axt Painting crews even wash the exterior window, clean out gutters, caulk the coach lamps at the brick or siding knowing that these are trouble spots and need attention.

At the finish line, is the WARRANTY AND MAINTENANCE PLAN. Our goal is to produce a job that lasts 10 YEARS OR MORE. Our clients enjoy the peace of mind of our routine maintenance inspections.

Take a moment to read our Testimonials and then Request Your Free Estimate today. You can always call our office at 770-928-8700 to speak with our friendly and knowledgeable staff to arrange an estimate.

Detail, quality, professional, experience and warranty…you’ll be happy you used Kenneth Axt Painting Contractors.

Best Picks For Painters

How To Paint Stucck | Ken Axt | Atlanta Painting Company
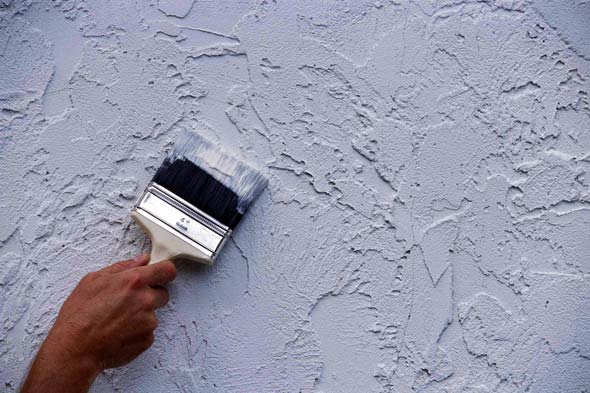
Once the surface has been prepared by pressure washing, cracks and bulges have been repaired, you are ready to begin the application process.

There are numerous coatings that can be used to paint stucco.  A high-quality flat latex paint such as Sherwin Williams Super Paint is a good coating and has good longevity.

The next level up is to apply an elastomeric such as Sherwin Williams Sherlastic.  This is a thicker coating that gives you protection and has the ability to stretch and to be very elastic.  It also fills small spider vein cracks when rolled.

The best coating would be Sherwin Williams Loxon XP. This product is a paint that is thick and acts like an elastomeric, and offers the additional protection from wind driven rain and water intrusion. It also has the ability to fill spider vein cracks when rolled.

There is an additional advantage of Sherwin Williams Sherlastic and Sherwin Williams Loxon XP. These coatings are so flexible, small spider vein cracks that may develop in the future are safely bridged over and do not break thru the thick elastic coating.

The method of application has a great deal to do with longevity. A coating can be just sprayed on and it will look good and have good performance.  A better application process for increased longevity would be to spray and while the coating is still wet to “back roll” through it.  This “back rolling” forces the material into the pores of the stucco surface.  If the surface is just sprayed there will be pin holing.  (If you were to spray pieces of glass and let it dry you would see that there are tiny pin holes throughout the sprayed coating). These pin holes are tiny weak places in the paint coating.  As the house weathers, mildew can grow on the original surface through these tiny holes.  The process of spraying and back rolling eliminates pin holing and also results in a thicker coating.

If greater longevity is desired, you can spray and back roll the first coat and then while the coating is still wet apply another medium spray coat on top of the wet back rolled surface.

The longest lasting process would be to coat the stucco with a first coat that is sprayed, and back rolled, let it dry for 24 hours. Then apply a final sprayed finish coat to the surface.


KEN AXT


How To Prepare Stucco For Painting

Stucco should be pressure washed to remove dirt, dust, mildew, algae and chalk to produce a sound surface and good adhesion for the finish coat.

Soft washing is a good technique to use because it is gentle on the surface and does not force water under high-pressure to leak through window and door openings.

Soft washing with a pressure washer using bleach is usually all that is needed to kill the mildew or the algae. This solution is applied using a pressure washer with a very wide tip which allows a low pressure stream of water.

If the stucco is chalky you can add an “emulsifier” to the bleach and water in order to help release the chalk as it is gently rinsed. If the chalking is excessive then a light pressure stripping is required. A medium size tip held about 2 feet away from the surface will remove the chalk.

You want to avoid applying the stucco paint on a chalky surface because it will cling to the chalk and not be able to penetrate all the way to the sound surface.

Mineral stains cannot be removed completely by pressure washing. These are stains left by rusty nails or copper roofs or even metal screens that are in the windows. These stains should be primed with a quality acrylic primer that is designed to seal the stain.

If there are large cracks or bulging stucco, these areas must be re-stuccoed. Stucco repair involves a three coat application process. A first coat which is called a brown coat, a second coat called a scratch coat, and finally the finish coat of stucco.

If there are medium size cracks, 1/8 inch to ¼ inch, then these are caulked with a textured caulk. When applying this textured caulk try to fill the crack only without allowing any excess to remain on the adjacent surfaces. While the caulk is still wet you can do a process called “wet wiping”. This is done by wiping off all the excess caulk with a dry paint brush and water so that the caulk remains only in the crack and is erased from all of the adjacent surfaces.

If there are small holes or small chips in the stucco they can be repaired with “stucco patch.” If there are small spider vein cracks then a high quality elastomeric paint should be used.
Elastomeric paint is thicker and able to fill the small cracks. These should be no bigger than 1/32nd of an inch or less.

Having pressure washed the surface, repaired stucco bulges and large cracks by re-stuccoing, filled medium size cracks with textured caulk, small holes and chipping with stucco patch, and spider veins filled using elastomeric paint this is back rolled, you are now ready to paint the stucco.

KEN AXT

1. Why does my paint turn yellow?

Sometimes paint yellows or turns color if it is affected by different heat sources such as heating ducts, baseboard heaters, stoves and ovens. It can also be caused by lack of light or air circulation being able to get to the surface of the paint. This can occur inside of closet doors and behind pictures and wall hangings. Lower quality oil base paint has a tendency to yellow more readily than a higher quality oil base paint. High-quality acrylic paint very rarely will yellow or turn color.

2. Why does my paint wash off the wall when I try to clean it?

Again, it’s the quality of the paint. Always use high-quality paint with an eggshell or satin finish for surfaces that will be washed or scrubbed frequently. (Note: before washing a newly painted surface allow it to dry for 5 to 7 days. The paint needs time to cure all the way through the coating and become hard before washing).

3. What is the best way to wash a wall surface?

When washing a wall surface a soft sponge should be used. It should be damp, but not saturated, in order to avoid water dripping down the wall. The sponge should have a drop or two of a very mild dishwashing detergent or wall cleaner. (Avoid the use of products that have ammonia or bleach ingredients as they can change the color of the
paint). After cleaning rinse the sponge out with clear water and sponge rinse the area that was cleaned.

4. Why does my wall get shiny spots in it when I rub against it?

This is called burnishing. This is most common when using a “deep tone” paint color and the wall is rubbed by people or furniture. This is due to the amount of pigment that is needed to produce the deep color. It can also occur after trying to scrub the wall to clean it. Lower grades of paint are more subject to this burnishing effect. (A deep tone
color painted with flat wall paint is a “no touch” surface). Use high quality paint and raise the sheen to an eggshell or satin to allow better resistance to physical touch and cleaning.

5. Why does my wood trim have brown stains in different places?

Sometimes you will notice a brown stain start to appear on trim surfaces such as crown moldings, baseboards, doors and window frames. If you look closely you will probably see that these are matching spliced pieces of wood glue together. Because there are so many different pieces of wood they invariably come from different trees and different
parts of the tree. Some of the spliced pieces may bleed through the coating if it comes from a tree that has high tanning content. It is similar to seeing a knot bleed in pieces of wood. The solution is to apply oil based “Kilz” primer to seal the stain. It can then be painted over with a quality finish coat.

The basic cause for peeling paint is poor adhesion.

Fortunately there is a good solution for correcting this problem.

Peeling paint can appear as lifting, bubbling, cracking, splitting, wrinkling, and even peeling between coatings.

The lack of adhesion can be caused by:

1. Not using a primer. Primer has a specific purpose and is formulated differently than a topcoat or finish coat. Primer is designed to soak deep in to the substrate and provide a tooth or slight coarseness for the finish coat to adhere to. The primer seals the surface and helps prevent moisture from soaking into the wood.

2. The use of a low quality primer. Low quality primer may not seal the wood thoroughly or give the adhesion necessary.

3. Painting over bare wood with a finish coat. The bare wood will draw pigments from the paint causing the topcoat, when it dries, to offer less protection.

4. Applying a finish coat that is too thick. This limits the ability of the paint to stretch and be elastic in different weather conditions and results in splitting.

5. Applying the paint too thin. This is a common mistake of most do-it-yourselfers. The finish coat lacks proper thickness and therefore cannot endure weathering.

6. Painting over a surface that is too glossy. The glossy surface is too slick for most top coats to adhere to. It must be sanded or de-glossed in order to allow adhesion.

7. The surface is dirty, chalky or mildewed. These conditions form a barrier that will prevent the paint from adhering to the surface.

8. Painting in direct sunlight. This causes the outer surface of the paint to dry too quickly and does not allow the inner surface of the paint to cure property. Bubbling usually occurs when this happens.

9. Painting over a wet surface. This also can cause bubbling because the moisture is trapped under the dried coating. The sun tries to draw the moisture out, but it cannot escape causing the paint to bubble.

The basic solution to all of the above problems is fairly simple but requires a bit of work to be successful.

The solution is to scrape off all the loose paint. This can be accomplished with a putty knife, a sander, or a hook scraper. Sometimes the peeling area needs to be “chased”. Having removed the loose paint from an area, you will find that the edges of the paint that surrounds the bare area are still loose. “Chasing” is chipping away at these edges until you find sound paint. If this is not done, these edges will pull and curl up as the primer dries.

You may want to sand these edges to a medium or fine smoothness so that the repaired area does not have a distinct edge. If the peeling is extensive you may want to use an environmentally friendly paint remover.

Next make sure the surface is dry and clean. This means there is no moisture, dirt, chalkiness, or mildew.

You are now ready to apply a good quality primer. Allow this to dry thoroughly.

Once dried, apply a top-quality finish coat.

You have achieved success!

Caulk failures occur for a variety of reasons.  One of the main reasons is failure to use a quality caulk.  Caulk that is of poor quality does not have the ability to stretch and flex. It will harden and continue to lose elasticity as time goes on.

Tips for Caulking on a Quality Home Painting Project

Adhesion is an important factor for caulking to be successful. Poor adhesion will result in the caulk pulling away from the surface and in some cases just falling out. Lack of adhesion is sometimes due to sheet rock dust that has not been cleaned off the surface, or from low-quality paint that is chalky. A clean surface is critical to adhesion.

Sometimes when cracks are very tight or too small, the caulk is not able to get into the crack, but will only bridge over the surface. This results in splitting with even minor temperature and humidity changes because the caulk did not get into the crack. There should be 16th of an inch to one quarter of an inch gap in the crack to be filled successfully.

When caulking interior trim the caulk is usually wet wiped to remove the excess and to give a clean look. If too much is removed in the wiping process it will result in a very thin bead that will readily crack and split.

When caulking interior trim to the wall and ceiling surfaces; i.e., crown moldings, door and window frames, baseboards, etc., caulk will sometimes fail if the trim pieces are not nailed tight. If you can push on a piece of trim and it moves it must be nailed tighter. Caulk is effected by temperature, humidity changes and even vibrations.

One area that is particularly susceptible to caulk splitting is on the staircases of the house where the stringers meet the walls. This is due to the vibrations from people walking up-and-down the staircase. One key to successful caulking of stringers is that they must be nailed tight. 

Exterior caulk should be applied thicker than interior caulk in order to endure the more dramatic weather changes. If the caulk is put on with too small of a bead it is more susceptible to cracking and splitting.

caulk paint prep marietta

An area that is difficult to caulk successfully on exteriors is the siding butt joints.  This is where the siding in the middle of the wall butts up against another piece of siding. Sometimes the old caulk must be razor cut from these butt joints. A gap of 1/8 of an inch to 3/8 of an inch is necessary for the caulk to get into the crack and produce a good joint.

So, just to review:

  1. A caulk must be high quality in order to have the elasticity and adhesion necessary.
  2. The surface must be clean of dust and chalky paint.
  3. The trim must be nailed tight.
  4. There should be a wide enough gap for caulk to actually fill the crack.
  5. On interior caulk, it should not be wet wiped excessively leaving too thin a bead.

I hope that this information has been helpful to you. If I can help with any questions please call 770-928-8700 or contact us for a free estimate, and I will be happy to help you further.

Thank you,

Kenneth

If you’re looking for Atlanta painting contractors with the experience and knowledge to handle the most demanding, high-end painting projects, call Kenneth W. Axt & Associates.  Ken founded the company in 1973, and still personally oversees the business along with his brother David. For over 40 years, the firm has focused on providing the highest level of quality while adhering to core values of fairness, honesty, and integrity. From the office staff that takes your initial call, to the crews in the field, all the way up to the Axt brothers, you’ll receive polite, efficient, and expert painting service. Beyond simply being a painting company, we also offer a variety of carpentry services, from deck staining, power washing, and rotten wood replacement, to stucco repair and hardie-plank installation. Plus when it comes to Atlanta painting contractors, you won’t get more value with any other firms once you consider not only our experience, but the additional services we offer. For example, we include a color consultant with every project, taking the guesswork out of color selection, and also giving you someone to hear all of your goals and desires for the look you’re hoping to achieve. Add to that our insistence on only using the finest quality materials from companies such as Sherwin Williams, and a work ethic that refuses to cut corners or take shortcuts, and you’ll receive the ultimate in painting contractor service from Kenneth Axt.

atlanta painting contractors 

The Atlanta Painting Contractors You Need


With so many options for Atlanta painting contractors, it’s important to understand that not all are created equal. So what makes us different, and why should you put your faith in Kenneth Axt for all your home and office painting projects? As we mentioned above, our company has always been family-run, and remains firmly planted in the belief that a job done right is done with integrity and honesty. While you’re sure to find some offering painting services for lower prices, it’s important to consider what you get for your investment. David and Kenneth Axt continue to handle estimates, and put their years of experience behind every quote. We don’t cover up problems, we fix them. We want our jobs to have longevity, and we take the steps needed to make that possible. That’s why we can offer a 10-year warranty on our product. Don’t take it from just us. Home Reports, Trust Dale, the Better Business Bureau, and Verified Home Services all rate us at the top, not to mention the testimonials of our clients. Contact us today, let us provide a free estimate, and see why we’re the cream of the crop in Atlanta painting contractors.