")
 Once the surface has been prepared by pressure washing, cracks and bulges have been repaired, you are ready to begin the application process.
There are numerous coatings that can be used to paint stucco. A high-quality flat latex paint such as Sherwin Williams Super Paint is a good coating and has good longevity.
The next level up is to apply an elastomeric such as Sherwin Williams Sherlastic. This is a thicker coating that gives you protection and has the ability to stretch and to be very elastic. It also fills small spider vein cracks when rolled.
The best coating would be Sherwin Williams Loxon XP. This product is a paint that is thick and acts like an elastomeric, and offers the additional protection from wind driven rain and water intrusion. It also has the ability to fill spider vein cracks when rolled.
There is an additional advantage of Sherwin Williams Sherlastic and Sherwin Williams Loxon XP. These coatings are so flexible, small spider vein cracks that may develop in the future are safely bridged over and do not break thru the thick elastic coating.
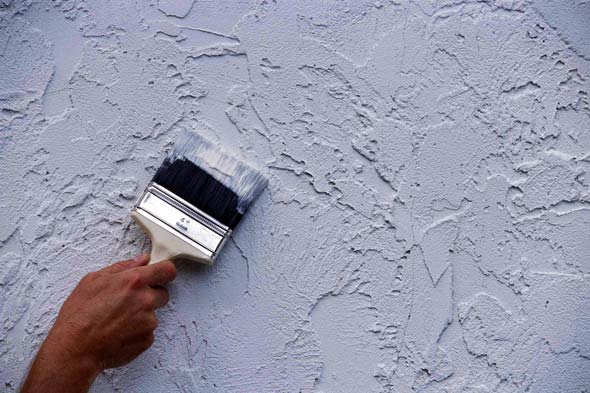
The method of application has a great deal to do with longevity. A coating can be just sprayed on and it will look good and have good performance. A better application process for increased longevity would be to spray and while the coating is still wet to “back roll” through it. This “back rolling” forces the material into the pores of the stucco surface. If the surface is just sprayed there will be pin holing. (If you were to spray pieces of glass and let it dry you would see that there are tiny pin holes throughout the sprayed coating). These pin holes are tiny weak places in the paint coating. As the house weathers, mildew can grow on the original surface through these tiny holes. The process of spraying and back rolling eliminates pin holing and also results in a thicker coating.
If greater longevity is desired, you can spray and back roll the first coat and then while the coating is still wet apply another medium spray coat on top of the wet back rolled surface.
The longest lasting process would be to coat the stucco with a first coat that is sprayed, and back rolled, let it dry for 24 hours. Then apply a final sprayed finish coat to the surface.
KEN AXT
Stucco should be pressure washed to remove dirt, dust, mildew, algae and chalk to produce a sound surface and good adhesion for the finish coat.
Soft washing is a good technique to use because it is gentle on the surface and does not force water under high-pressure to leak through window and door openings.
Soft washing with a pressure washer using bleach is usually all that is needed to kill the mildew or the algae. This solution is applied using a pressure washer with a very wide tip which allows a low pressure stream of water.
If the stucco is chalky you can add an “emulsifier” to the bleach and water in order to help release the chalk as it is gently rinsed. If the chalking is excessive then a light pressure stripping is required. A medium size tip held about 2 feet away from the surface will remove the chalk.
You want to avoid applying the stucco paint on a chalky surface because it will cling to the chalk and not be able to penetrate all the way to the sound surface.
Mineral stains cannot be removed completely by pressure washing. These are stains left by rusty nails or copper roofs or even metal screens that are in the windows. These stains should be primed with a quality acrylic primer that is designed to seal the stain.
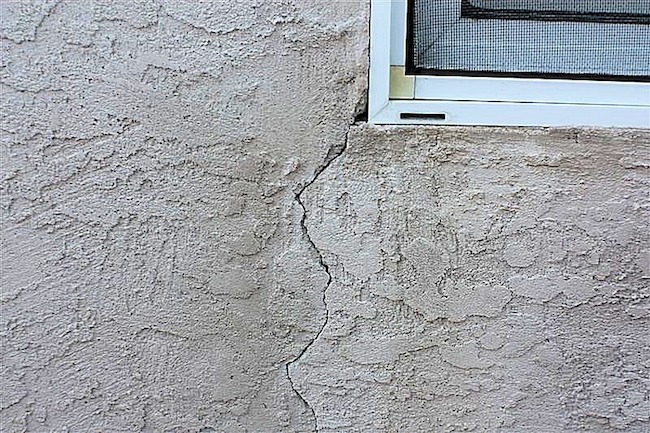
If there are large cracks or bulging stucco, these areas must be re-stuccoed. Stucco repair involves a three coat application process. A first coat which is called a brown coat, a second coat called a scratch coat, and finally the finish coat of stucco.
If there are medium size cracks, 1/8 inch to ¼ inch, then these are caulked with a textured caulk. When applying this textured caulk try to fill the crack only without allowing any excess to remain on the adjacent surfaces. While the caulk is still wet you can do a process called “wet wiping”. This is done by wiping off all the excess caulk with a dry paint brush and water so that the caulk remains only in the crack and is erased from all of the adjacent surfaces.
If there are small holes or small chips in the stucco they can be repaired with “stucco patch.” If there are small spider vein cracks then a high quality elastomeric paint should be used.
Elastomeric paint is thicker and able to fill the small cracks. These should be no bigger than 1/32nd of an inch or less.
Having pressure washed the surface, repaired stucco bulges and large cracks by re-stuccoing, filled medium size cracks with textured caulk, small holes and chipping with stucco patch, and spider veins filled using elastomeric paint this is back rolled, you are now ready to paint the stucco.
KEN AXT
The basic cause for peeling paint is poor adhesion.
Fortunately there is a good solution for correcting this problem.
Peeling paint can appear as lifting, bubbling, cracking, splitting, wrinkling, and even peeling between coatings.
The lack of adhesion can be caused by:
1. Not using a primer. Primer has a specific purpose and is formulated differently than a topcoat or finish coat. Primer is designed to soak deep in to the substrate and provide a tooth or slight coarseness for the finish coat to adhere to. The primer seals the surface and helps prevent moisture from soaking into the wood.
2. The use of a low quality primer. Low quality primer may not seal the wood thoroughly or give the adhesion necessary.
3. Painting over bare wood with a finish coat. The bare wood will draw pigments from the paint causing the topcoat, when it dries, to offer less protection.
4. Applying a finish coat that is too thick. This limits the ability of the paint to stretch and be elastic in different weather conditions and results in splitting.
5. Applying the paint too thin. This is a common mistake of most do-it-yourselfers. The finish coat lacks proper thickness and therefore cannot endure weathering.
6. Painting over a surface that is too glossy. The glossy surface is too slick for most top coats to adhere to. It must be sanded or de-glossed in order to allow adhesion.
7. The surface is dirty, chalky or mildewed. These conditions form a barrier that will prevent the paint from adhering to the surface.
8. Painting in direct sunlight. This causes the outer surface of the paint to dry too quickly and does not allow the inner surface of the paint to cure property. Bubbling usually occurs when this happens.
9. Painting over a wet surface. This also can cause bubbling because the moisture is trapped under the dried coating. The sun tries to draw the moisture out, but it cannot escape causing the paint to bubble.
The basic solution to all of the above problems is fairly simple but requires a bit of work to be successful.
The solution is to scrape off all the loose paint. This can be accomplished with a putty knife, a sander, or a hook scraper. Sometimes the peeling area needs to be “chased”. Having removed the loose paint from an area, you will find that the edges of the paint that surrounds the bare area are still loose. “Chasing” is chipping away at these edges until you find sound paint. If this is not done, these edges will pull and curl up as the primer dries.
You may want to sand these edges to a medium or fine smoothness so that the repaired area does not have a distinct edge. If the peeling is extensive you may want to use an environmentally friendly paint remover.
Next make sure the surface is dry and clean. This means there is no moisture, dirt, chalkiness, or mildew.
You are now ready to apply a good quality primer. Allow this to dry thoroughly.
Once dried, apply a top-quality finish coat.
You have achieved success!
Caulk failures occur for a variety of reasons. One of the main reasons is failure to use a quality caulk. Caulk that is of poor quality does not have the ability to stretch and flex. It will harden and continue to lose elasticity as time goes on.
Tips for Caulking on a Quality Home Painting Project
Adhesion is an important factor for caulking to be successful. Poor adhesion will result in the caulk pulling away from the surface and in some cases just falling out. Lack of adhesion is sometimes due to sheet rock dust that has not been cleaned off the surface, or from low-quality paint that is chalky. A clean surface is critical to adhesion.
Sometimes when cracks are very tight or too small, the caulk is not able to get into the crack, but will only bridge over the surface. This results in splitting with even minor temperature and humidity changes because the caulk did not get into the crack. There should be 16th of an inch to one quarter of an inch gap in the crack to be filled successfully.
When caulking interior trim the caulk is usually wet wiped to remove the excess and to give a clean look. If too much is removed in the wiping process it will result in a very thin bead that will readily crack and split.
When caulking interior trim to the wall and ceiling surfaces; i.e., crown moldings, door and window frames, baseboards, etc., caulk will sometimes fail if the trim pieces are not nailed tight. If you can push on a piece of trim and it moves it must be nailed tighter. Caulk is effected by temperature, humidity changes and even vibrations.
One area that is particularly susceptible to caulk splitting is on the staircases of the house where the stringers meet the walls. This is due to the vibrations from people walking up-and-down the staircase. One key to successful caulking of stringers is that they must be nailed tight.
Exterior caulk should be applied thicker than interior caulk in order to endure the more dramatic weather changes. If the caulk is put on with too small of a bead it is more susceptible to cracking and splitting.

An area that is difficult to caulk successfully on exteriors is the siding butt joints. This is where the siding in the middle of the wall butts up against another piece of siding. Sometimes the old caulk must be razor cut from these butt joints. A gap of 1/8 of an inch to 3/8 of an inch is necessary for the caulk to get into the crack and produce a good joint.
So, just to review:
- A caulk must be high quality in order to have the elasticity and adhesion necessary.
- The surface must be clean of dust and chalky paint.
- The trim must be nailed tight.
- There should be a wide enough gap for caulk to actually fill the crack.
- On interior caulk, it should not be wet wiped excessively leaving too thin a bead.
I hope that this information has been helpful to you. If I can help with any questions please call 770-928-8700 or contact us for a free estimate, and I will be happy to help you further.
Thank you,
Kenneth
In the metro Atlanta area, you won’t find a more experienced, professional painting operation than the team here at Kenneth W. Axt & Associates. With over 40 years of experience providing exceptional painting service and results, we are here to guide you through each step of the painting process. From the moment you call requesting a quote, throughout the color selection, and ultimately finishing with a beautifully executed painting project, you’ll understand the difference in quality and expertise that comes with our service. Specializing in fine homes, we use nothing but the highest quality materials, with exciting Sherwin Williams colors and paints offering limitless possibilities to reinvent the look and feel of your home. Beyond the expert painting techniques and years of experience, you’ll also benefit from the additional services of our highly skilled color consultants. Free of charge, these professionals will listen to your wishes and work with you to choose the best Sherwin Williams colors for your home. In addition to high-end residential properties, we’re also glad to work with commercial clients, so keep Kenneth Axt Painting Contractors in mind for your office makeover as well.
Expert Knowledge Of Sherwin Williams Colors, Unbeatable Service
We know you have lots of choices when it comes to a painting contractor Atlanta. That’s why we want to stress to you what makes us different, and the best choice for your home or office painting needs. As a family operated business, you’ll personally meet David and Kenneth Axt, as they personally handle all estimates. With their 40+ years of experience and a 10-year warranty, you can count on their knowledge and expertise to provide an accurate estimate using only the best in Sherwin Williams colors and products. As mentioned above, beyond the experience of the Axt brothers, color consultants will also walk-through your home with you to better understand your hopes for the painting project. Once we’ve carefully processed those goals, they will recommend Sherwin Williams colors that can transform a dull, outdated feel into a wonderfully vibrant new look. Contact us today, get your free estimate, and let’s get started on giving your home or office a beautiful new look!
Lead Based Paint
Does my house have lead based paint? Does my house require lead paint removal?
There are three basic ways to determine if lead-based paint is present.
One is to use an EPA recognized test kit. This is done by certified renovators. The second way is to use x-ray fluorescent instruments. This is done by certified lead based paint inspectors or risk assessors. The third way is to do a paint chip sampling and laboratory testing. Again, this is done by certain lead based paint inspectors or risk assessors.
The EPA recognized test kits will produce a pink to red color when lead is present. If there is no color change on the painting film tested, lead based paint is not present and lead safe work practices are not required on the surface.
Lead testing must be performed prior to any painting or renovation work. All testing is to be performed by the appropriate qualified professionals.
25% of homes built between 1960 and 1978 have lead present. 66% of homes built between 1940 and 1959 have lead present. 86% of homes built before 1940 have lead present.
The EPA’s RRP rule assumes that any house built before 1978 contains lead based paint. Homes built before 1960 are more likely than homes built after 1960 to contain lead based paint.
The federal standards define lead based paint as any paint or coating that contains lead equal to 1.0mg/cm² or more than .5% by weight.
Lead based paint was introduced to the paint industry to enable added color and durability. Lead based paint was banned in 1978.
 The reason for concern is the health risks of lead. It is very hazardous to children and damages the brain and central nervous system and can cause decreased intelligence, behavioral problems, and hyperactivity. Damage can be irreversible. It is also hazardous to pregnant women, workers and other adults. Lead produces high blood pressure and physical fatigue. Lead exposure causes permanent damage.
The dust and debris is a problem. Renovation activities that disturb lead based paint create dust and debris. Lead contaminated dust is poisonous. Children and adults can swallow or breathe this dust.
What are the EPA and HUD rules on lead based paint?
For clarification obtain a copy of the regulations from the national lead information center at 1-800-424-LEAD. You can also download the rules and other information from these websites: www.epa.gov/lead or www.hud.gov/offices/lead.
The painting contractor must make sure he satisfies state, local, EPA and HUD requirements.
The renovation, repair, and painting rule does not apply to renovation work that meets the following exclusions. If the renovation only affects components that do not contain lead based paint, the rule does not apply. The EPA has established limits for minor repairs or maintenance. Work that does not exceed these limits is exempt from the work practice requirements in the rule.
The EPA definition of minor repair and maintenance activities are: (1) Interior work disturbing less than 6ft.² per room of painted surface is exempt. (2) Exterior work disturbing less and 20ft.² per side of painted surface is exempt from the work practice requirements.
There is also an RRP opt out provision. Homeowners may sign a statement to opt out of the work practice requirements in the rule, if all of the following are true: The owner resides in the house; no child under six years old resides in the house, and the house is not a child occupied facility; no pregnant woman resides in the house; no child occupied facility exist on the property; and, the owner signs a written acknowledgment that the certified firm is not required to use work practices found in the rule. Again, because federal, state and local regulations may vary, please contact the EPA as listed above for further information.
The EPA may suspend a firm’s certification if it is found to be in non-compliance. These firms can be liable for civil penalties of up to $32,500 for each violation.
An example of details of some of the work practice requirements for interior renovation is as follows: Remove all objects from the work area, or cover them with plastic sheeting. Seams and edges are to be sealed. Close and cover all duct openings in the work area. Doors must be covered with plastic sheeting. Cover the floor surface with taped down plastic sheeting in the work area a minimum of 6 feet beyond the perimeter of surfaces undergoing renovation or a sufficient distance to contain the dust. Use precautions to ensure that all personnel, tools, and other items, including the exterior of waste containers are free of dust and debris when leaving the work area. After completed the firm must clean the work area until no dust, debris or residue remains. All paint chips and debris must be collected and sealed in a heavy duty bag. All protective sheeting is to be removed and disposed of as waste. All objects and surfaces are cleaned within 2 feet of the work area. Walls are to be cleaned starting at the ceiling and working down to the floor by either vacuuming with a HEPA vacuum or wiping with a damp cloth. Thoroughly vacuum all remaining surfaces and objects in the work area, including furniture and fixtures, with a HEPA vacuum. All remaining surfaces are to be wiped with a damp cloth. This is just an example of how much work and effort goes into creating a finished safe work area.
Ken Axt
It may be that the higher cost is a much better value because the painting contractor is very thorough and attends to a lot of details that the other contractors miss or ignore.
Obviously using high end materials can cost $20-$40 more per gallon and is worth it because of the longevity that they are forward. He may be using caulk which is the best on the market and cost $11 per tube. And caulking, being such a critical function is well worth the cost as it helps prevent rotting wood. There are some specialty materials he may be using such as special metal roof paints that last twice as long as a regular house paint. He may be using an $80 per gallon oil base metal paint for the iron porch railings. Marine varnish is up to $100 per gallon for the highest quality. There are also special acrylics that are purchased to use on coach lamps and chimney caps. He might have higher skilled men that are paid better. All these things amount to great longevity.
He may be doing other things such as and washing all the exterior window, cleaning gutters, caulking the coach lamps at the brick or siding and may be just very detailed knowing that these are trouble spots and need attention.
The high estimate is often times because they have paid very thorough attention to the details of the carpentry that is required to replacwe all the rotten wood. A visual inspection of the carpentry will miss a lot of areas of rot. He knows that if these are not attended to the homeowner will be replacing rotten wood and painting again the next year. It requires a physical inspection.
All these things contribute to a comparatively higher estimate but is well worth the money to make sure the house painting has great longevity and potential problem areas are attended to.