Iron Ore: Sherwin Williams Color of the Month

If you need a little drama in your life and in your home, Sherwin Williams color pick for March 2022 will definitely strike a cord.

IRON ORE, SW 7069, is a warm charcoal that will play well with other warm earth tones as well as warm toned metals like antique brass, copper, or gold.

March 2022 Color of the Month

Using Iron Ore

Working with this rich color, with an LRV (light reflective value) of 6 may seem tricky but in the right circumstances, it is stunning and luxe.

On an accent wall, Iron Ore will command attention. Think, fireplace wall painted from floor to ceiling a deep, rich charcoal gray. With ample natural light and lighter furnishings, Iron Ore creates a luxurious feel.

On cabinetry. Whether you want to paint the kitchen island or your built in, SW 7069 is a winner.

As an exterior paint color…you’ve seen the seemingly BLACK facades on Pinterest that everyone loves…think Iron Ore. With stone accents, copper gutters and a lush green landscape.

Hopefully you will find some wonderful inspiration to include this luxurious color into your home!

Get Started

When you’re ready to get started on your next painting project, remember, we offer a FREE COLOR CONSULTATION with our design expert in your home. Call the office today to schedule your free painting estimate, 770-928-8700 or CLICK THE EASY BUTTON below.

How To Paint Stucck | Ken Axt | Atlanta Painting Company
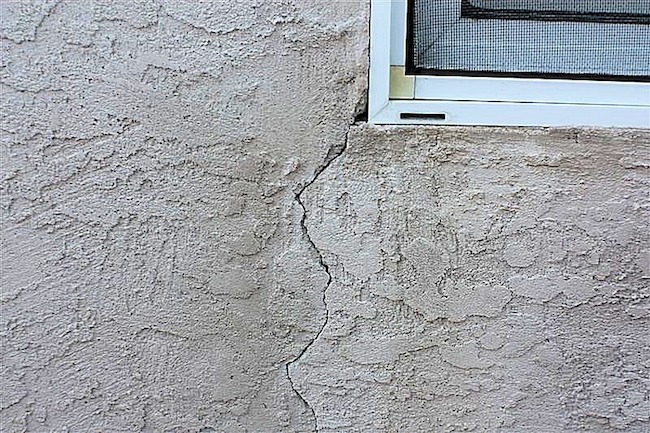
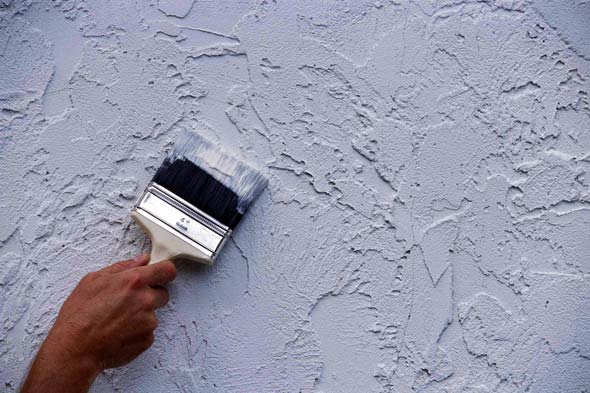
Once the surface has been prepared by pressure washing, cracks and bulges have been repaired, you are ready to begin the application process.

There are numerous coatings that can be used to paint stucco.  A high-quality flat latex paint such as Sherwin Williams Super Paint is a good coating and has good longevity.

The next level up is to apply an elastomeric such as Sherwin Williams Sherlastic.  This is a thicker coating that gives you protection and has the ability to stretch and to be very elastic.  It also fills small spider vein cracks when rolled.

The best coating would be Sherwin Williams Loxon XP. This product is a paint that is thick and acts like an elastomeric, and offers the additional protection from wind driven rain and water intrusion. It also has the ability to fill spider vein cracks when rolled.

There is an additional advantage of Sherwin Williams Sherlastic and Sherwin Williams Loxon XP. These coatings are so flexible, small spider vein cracks that may develop in the future are safely bridged over and do not break thru the thick elastic coating.

The method of application has a great deal to do with longevity. A coating can be just sprayed on and it will look good and have good performance.  A better application process for increased longevity would be to spray and while the coating is still wet to “back roll” through it.  This “back rolling” forces the material into the pores of the stucco surface.  If the surface is just sprayed there will be pin holing.  (If you were to spray pieces of glass and let it dry you would see that there are tiny pin holes throughout the sprayed coating). These pin holes are tiny weak places in the paint coating.  As the house weathers, mildew can grow on the original surface through these tiny holes.  The process of spraying and back rolling eliminates pin holing and also results in a thicker coating.

If greater longevity is desired, you can spray and back roll the first coat and then while the coating is still wet apply another medium spray coat on top of the wet back rolled surface.

The longest lasting process would be to coat the stucco with a first coat that is sprayed, and back rolled, let it dry for 24 hours. Then apply a final sprayed finish coat to the surface.


KEN AXT


How To Prepare Stucco For Painting

Stucco should be pressure washed to remove dirt, dust, mildew, algae and chalk to produce a sound surface and good adhesion for the finish coat.

Soft washing is a good technique to use because it is gentle on the surface and does not force water under high-pressure to leak through window and door openings.

Soft washing with a pressure washer using bleach is usually all that is needed to kill the mildew or the algae. This solution is applied using a pressure washer with a very wide tip which allows a low pressure stream of water.

If the stucco is chalky you can add an “emulsifier” to the bleach and water in order to help release the chalk as it is gently rinsed. If the chalking is excessive then a light pressure stripping is required. A medium size tip held about 2 feet away from the surface will remove the chalk.

You want to avoid applying the stucco paint on a chalky surface because it will cling to the chalk and not be able to penetrate all the way to the sound surface.

Mineral stains cannot be removed completely by pressure washing. These are stains left by rusty nails or copper roofs or even metal screens that are in the windows. These stains should be primed with a quality acrylic primer that is designed to seal the stain.

If there are large cracks or bulging stucco, these areas must be re-stuccoed. Stucco repair involves a three coat application process. A first coat which is called a brown coat, a second coat called a scratch coat, and finally the finish coat of stucco.

If there are medium size cracks, 1/8 inch to ¼ inch, then these are caulked with a textured caulk. When applying this textured caulk try to fill the crack only without allowing any excess to remain on the adjacent surfaces. While the caulk is still wet you can do a process called “wet wiping”. This is done by wiping off all the excess caulk with a dry paint brush and water so that the caulk remains only in the crack and is erased from all of the adjacent surfaces.

If there are small holes or small chips in the stucco they can be repaired with “stucco patch.” If there are small spider vein cracks then a high quality elastomeric paint should be used.
Elastomeric paint is thicker and able to fill the small cracks. These should be no bigger than 1/32nd of an inch or less.

Having pressure washed the surface, repaired stucco bulges and large cracks by re-stuccoing, filled medium size cracks with textured caulk, small holes and chipping with stucco patch, and spider veins filled using elastomeric paint this is back rolled, you are now ready to paint the stucco.

KEN AXT

1. Why does my paint turn yellow?

Sometimes paint yellows or turns color if it is affected by different heat sources such as heating ducts, baseboard heaters, stoves and ovens. It can also be caused by lack of light or air circulation being able to get to the surface of the paint. This can occur inside of closet doors and behind pictures and wall hangings. Lower quality oil base paint has a tendency to yellow more readily than a higher quality oil base paint. High-quality acrylic paint very rarely will yellow or turn color.

2. Why does my paint wash off the wall when I try to clean it?

Again, it’s the quality of the paint. Always use high-quality paint with an eggshell or satin finish for surfaces that will be washed or scrubbed frequently. (Note: before washing a newly painted surface allow it to dry for 5 to 7 days. The paint needs time to cure all the way through the coating and become hard before washing).

3. What is the best way to wash a wall surface?

When washing a wall surface a soft sponge should be used. It should be damp, but not saturated, in order to avoid water dripping down the wall. The sponge should have a drop or two of a very mild dishwashing detergent or wall cleaner. (Avoid the use of products that have ammonia or bleach ingredients as they can change the color of the
paint). After cleaning rinse the sponge out with clear water and sponge rinse the area that was cleaned.

4. Why does my wall get shiny spots in it when I rub against it?

This is called burnishing. This is most common when using a “deep tone” paint color and the wall is rubbed by people or furniture. This is due to the amount of pigment that is needed to produce the deep color. It can also occur after trying to scrub the wall to clean it. Lower grades of paint are more subject to this burnishing effect. (A deep tone
color painted with flat wall paint is a “no touch” surface). Use high quality paint and raise the sheen to an eggshell or satin to allow better resistance to physical touch and cleaning.

5. Why does my wood trim have brown stains in different places?

Sometimes you will notice a brown stain start to appear on trim surfaces such as crown moldings, baseboards, doors and window frames. If you look closely you will probably see that these are matching spliced pieces of wood glue together. Because there are so many different pieces of wood they invariably come from different trees and different
parts of the tree. Some of the spliced pieces may bleed through the coating if it comes from a tree that has high tanning content. It is similar to seeing a knot bleed in pieces of wood. The solution is to apply oil based “Kilz” primer to seal the stain. It can then be painted over with a quality finish coat.

Check to make sure you are using the proper roller cover. The type of roller cover that should be used is usually specified on the can of paint. It can make a significant difference and save money by avoiding the cost of having to apply a 2nd coat of paint. 

Application technique is important for an even solid coating. Apply the paint in an “N” fashion on the upper portion of the wall and then apply a second “N” pattern on the bottom of the wall. Now go back and lightly roll over while the paint is still wet from floor to ceiling to smooth out and even the application. Another roller application technique used by professionals is to apply a roller full to the wall about 6 inches above the baseboard and roll up to within 6 inches of the ceiling. Roll through this area two or three times and then begin to extend the paint up toward the ceiling cut-in line then roll down to the bottom and extend the paint down to the baseboard cut-in. The next roller full again starts at 6 inches above the baseboard and rolls up to within 6 inches of the ceiling overlapping the first roller coating by 50%. After three roller fulls have been applied and extended up to the ceiling cutline and down to the baseboard cutline, lightly smooth all three applications. Now begin the next section overlapping 50% of the previous roller application. When the next three roller applications have been completed lightly smooth the wet paint of the last three roller applications. This will produce a very even and smooth wall surface with no roller marks and no thin spots.

Good coverage can also be affected by the quality of roller frame. If it is too flimsy it will produce a different texture and thickness on one side of the roller cover. A quality frame is sturdier and will not bend on the side of the roller cover that is away from the frame. It will produce an even texture.

Of course, the higher the quality of the paint the better the coverage will be. Lower quality paint does not have the ingredients and quality of pigments necessary for great coverage. 

With quality paint a large number of colors will cover over another color with one coat. You can end up spending more with low quality paint because it will probably require two coats. A common homeowner mistake to be avoided is to spread the paint too thin. Put on a good solid even coat. Do not try to stretch the paint too far.

How do I avoid roller marks and excessive texture when rolling my walls?

These problems usually occur on the wall surface when care is not taken to lightly smooth the paint during the application process. Pressing too hard on the roller will cause roller marks or tracks. You can also get a stipple effect or heavy texture on the wall surface if you are using the wrong roller cover or if the quality of the paint is poor. Lower quality paints have a tendency to dry quicker and do not allow the paint to stay wet long enough to lay flat. To avoid this problem lightly roll over the surface while the paint is still wet until no roller marks remain.

The basic cause for peeling paint is poor adhesion.

Fortunately there is a good solution for correcting this problem.

Peeling paint can appear as lifting, bubbling, cracking, splitting, wrinkling, and even peeling between coatings.

The lack of adhesion can be caused by:

1. Not using a primer. Primer has a specific purpose and is formulated differently than a topcoat or finish coat. Primer is designed to soak deep in to the substrate and provide a tooth or slight coarseness for the finish coat to adhere to. The primer seals the surface and helps prevent moisture from soaking into the wood.

2. The use of a low quality primer. Low quality primer may not seal the wood thoroughly or give the adhesion necessary.

3. Painting over bare wood with a finish coat. The bare wood will draw pigments from the paint causing the topcoat, when it dries, to offer less protection.

4. Applying a finish coat that is too thick. This limits the ability of the paint to stretch and be elastic in different weather conditions and results in splitting.

5. Applying the paint too thin. This is a common mistake of most do-it-yourselfers. The finish coat lacks proper thickness and therefore cannot endure weathering.

6. Painting over a surface that is too glossy. The glossy surface is too slick for most top coats to adhere to. It must be sanded or de-glossed in order to allow adhesion.

7. The surface is dirty, chalky or mildewed. These conditions form a barrier that will prevent the paint from adhering to the surface.

8. Painting in direct sunlight. This causes the outer surface of the paint to dry too quickly and does not allow the inner surface of the paint to cure property. Bubbling usually occurs when this happens.

9. Painting over a wet surface. This also can cause bubbling because the moisture is trapped under the dried coating. The sun tries to draw the moisture out, but it cannot escape causing the paint to bubble.

The basic solution to all of the above problems is fairly simple but requires a bit of work to be successful.

The solution is to scrape off all the loose paint. This can be accomplished with a putty knife, a sander, or a hook scraper. Sometimes the peeling area needs to be “chased”. Having removed the loose paint from an area, you will find that the edges of the paint that surrounds the bare area are still loose. “Chasing” is chipping away at these edges until you find sound paint. If this is not done, these edges will pull and curl up as the primer dries.

You may want to sand these edges to a medium or fine smoothness so that the repaired area does not have a distinct edge. If the peeling is extensive you may want to use an environmentally friendly paint remover.

Next make sure the surface is dry and clean. This means there is no moisture, dirt, chalkiness, or mildew.

You are now ready to apply a good quality primer. Allow this to dry thoroughly.

Once dried, apply a top-quality finish coat.

You have achieved success!

In the metro Atlanta area, you won’t find a more experienced, professional painting operation than the team here at Kenneth W. Axt & Associates. With over 40 years of experience providing exceptional painting service and results, we are here to guide you through each step of the painting process. From the moment you call requesting a quote, throughout the color selection, and ultimately finishing with a beautifully executed painting project, you’ll understand the difference in quality and expertise that comes with our service. Specializing in fine homes, we use nothing but the highest quality materials, with exciting Sherwin Williams colors and paints offering limitless possibilities to reinvent the look and feel of your home. Beyond the expert painting techniques and years of experience, you’ll also benefit from the additional services of our highly skilled color consultants. Free of charge, these professionals will listen to your wishes and work with you to choose the best Sherwin Williams colors for your home. In addition to high-end residential properties, we’re also glad to work with commercial clients, so keep Kenneth Axt Painting Contractors in mind for your office makeover as well.

sherwin williams colors

Expert Knowledge Of Sherwin Williams Colors, Unbeatable Service


We know you have lots of choices when it comes to a painting contractor Atlanta. That’s why we want to stress to you what makes us different, and the best choice for your home or office painting needs. As a family operated business, you’ll personally meet David and Kenneth Axt, as they personally handle all estimates. With their 40+ years of experience and a 10-year warranty, you can count on their knowledge and expertise to provide an accurate estimate using only the best in Sherwin Williams colors and products. As mentioned above, beyond the experience of the Axt brothers, color consultants will also walk-through your home with you to better understand your hopes for the painting project. Once we’ve carefully processed those goals, they will recommend Sherwin Williams colors that can transform a dull, outdated feel into a wonderfully vibrant new look. Contact us today, get your free estimate, and let’s get started on giving your home or office a beautiful new look!